
Sunday, February 2, 2014
a bit of inspiration
If you spend much time on Pinterest, you will see lots of inspirational quotes and statements on pretty background pictures. So just for fun I decided to make some inspirational pics of my own photos. This one comes from a fortune cookie I got a few years ago...
Friday, January 31, 2014
Catching up on the bathroom project
Still trying to get caught up on the bathroom progress so here is some of the tiling and plumbing for the bathtub. I started off with the tile under the window. The seat is covered in large Tavertine marble and for the wall I used multi-colored slate. Notice the old water pipes sticking up in the lower right corner....these will be replaced shortly.
 Along the edge of the seat, I used some long thin rounded tiles to hide the flat edge of the marble. These took some effort hold in place until they set.
 After this I had to stop and wait for the plumbing. We originally planned to hire a plumber, but a friend a work had some plumbing experience and wanted to teach me to braze copper. With some practice work and a little supervision we managed to get it right with no leaks! The valve handles and tub spout will connect to this hardware in the wall.
 The next step was replacing the backer board over the plumbing. By the way...the little black kitty in the window is Inka. We adopted him last year a couple of months after we lost Jasper.
 And then of course more tiling...
 And for the last picture we have all the tile on the walls!
 In the next post I'll show the results after grouting (much darker!) and the start on the floor tiling.
Sunday, January 26, 2014
Shower Remodel - final results!
For those who still haven't seen it...here is the final result of the shower. Before we installed the glass I wanted to start the tile on the wall next to the shower. It started off ugly when I put the backer board up without insulation and didn't realize it until some of the tile was on. Fortunately I could cut the board enough to get insulation in all the sections except one, and that I VERY carefully filled with expanding foam.

Next came the glass. We hired this part out. It would have taken some special tools and a lot more courage than I have to measure the glass and install it. With this and the faucet hardware installed we finally have a working shower!

For anyone who may be wondering...the project took 6 months from tear out of the original shower to finishing the glass. The other tile work is still in progress - mainly due to all my other projects, trips, and that pesky career that often demands my time!
Next came the glass. We hired this part out. It would have taken some special tools and a lot more courage than I have to measure the glass and install it. With this and the faucet hardware installed we finally have a working shower!
For anyone who may be wondering...the project took 6 months from tear out of the original shower to finishing the glass. The other tile work is still in progress - mainly due to all my other projects, trips, and that pesky career that often demands my time!
Sunday, June 23, 2013
Shower Remodel, Weekend 12-14
Well it's long past time for an update. I'm excited to say we are getting close to a functional shower again! I think it's been 3 weekends of work now (maybe 4?) although some didn't have much more than a few hours of work. It started with the last of the tiling on the curb and leading up to the corner where the shower will meet the wall tile outside it. Here is the curb:


Once the tiles were finally set, it was time for the grout. This should have gone quickly, but of course I didn't want to use standard grout! Everything I've researched says grout is the weak link - it is porous enough to stay wet and provide a home for mold and mildew growth (unless you wipe down the shower with a squeegee or towel every time you use it and that is so not happening). So there are epoxy based grouts which are better and don't require sealing, but they are supposedly very difficult to install on walls. And then there are a couple of urethane based grouts. They have the same qualities as epoxy and are slightly easier to install on vertical surfaces. They also have the best color consistency, and they are the most expensive of course! So guess what I used - Urethane. Specifically QuartzLock 2.
Grouting the walls was SLOW! This stuff dries super fast so you have to clean as you go or it leaves a shiny film on the tile plus well adhered sand where you don't want it. Fortunately I discovered acetone is my friend for clean up in the places I was really concerned about the film. Now it's finally done and the grout does look nice. All I have left is caulking the corners and installing the shower fixtures.
and some closeups...
The drain still has a protective film on it - it will be brushed stainless when it's removed.
and lastly, I've started on the corner. It will have the shower tile, slate on two surfaces, and Travertine marble on the flat shelf. This sucker is tricky, but I have a plan now so it should move along quickly.
Sunday, May 12, 2013
Memorial Park Maintenance
Our Memorial Park event turned out to be a big success! Somehow I remembered to take a few photos after lunch so here is our work crew:

Joining the faces you may recognize is the Pratt family (PratFamily777) on the left, who discovered letterboxing two months ago. They also brought their adorable "baby" Cooper who made fast friends with Dragon Warrior (Alex). I have to admit I'm not much of a dog person, but Cooper was an absolute angel!


We started off with the usual round of exchanges and split up for the morning to check on different sections. We regrouped for lunch shared our mud stories. While the weather was beautiful Saturday, it rained enough Thursday night and Friday to make the trails a mess. Some of the boxes required wading to reach them, and everyone had to navigate sticky portions of the trails. We are proud of our mud!


After lunch we headed back out on the trails for the afternoon. Somehow after lunch, most of the group ended up boxing together and this turned out to be a big help. We found several boxes by pure accident just by having several people looking in the general area. Our big find for the day was The Patchwork Girl of Oz. It's home turned into a clearing (probably bulldozed) filled with logs and branches. Can you find the box in this photo?

Let's make it a little easier. Try this view:

Give up? Ok, here is the answer:

Somehow Wry Me managed to spot the little corner sticking up out of the dirt. So she was our hero for the afternoon. The box was broken and soaking wet,

but somehow the stamp was in great shape. So we put it in a new box, added a logbook and moved it to a new and hopefully safer home.
When it was all said and done we had a great day with some great company! I'd like to thank everyone who came, and Boots Tex who recently updated the Nada Clue series everyone enjoyed so much. (and the new location is beautiful!). Thanks for playing in the mud and saving some boxes!
Joining the faces you may recognize is the Pratt family (PratFamily777) on the left, who discovered letterboxing two months ago. They also brought their adorable "baby" Cooper who made fast friends with Dragon Warrior (Alex). I have to admit I'm not much of a dog person, but Cooper was an absolute angel!
We started off with the usual round of exchanges and split up for the morning to check on different sections. We regrouped for lunch shared our mud stories. While the weather was beautiful Saturday, it rained enough Thursday night and Friday to make the trails a mess. Some of the boxes required wading to reach them, and everyone had to navigate sticky portions of the trails. We are proud of our mud!
After lunch we headed back out on the trails for the afternoon. Somehow after lunch, most of the group ended up boxing together and this turned out to be a big help. We found several boxes by pure accident just by having several people looking in the general area. Our big find for the day was The Patchwork Girl of Oz. It's home turned into a clearing (probably bulldozed) filled with logs and branches. Can you find the box in this photo?
Give up? Ok, here is the answer:
Somehow Wry Me managed to spot the little corner sticking up out of the dirt. So she was our hero for the afternoon. The box was broken and soaking wet,
but somehow the stamp was in great shape. So we put it in a new box, added a logbook and moved it to a new and hopefully safer home.
When it was all said and done we had a great day with some great company! I'd like to thank everyone who came, and Boots Tex who recently updated the Nada Clue series everyone enjoyed so much. (and the new location is beautiful!). Thanks for playing in the mud and saving some boxes!
Saturday, May 4, 2013
Memorial Park Information
Memorial Park in Houston is a significant part of Texas letterboxing history. It was home to several events and at one point boasted the highest concentration of boxes in the state. Sadly the drought in 2011 caused many of the park's pine trees to die, and the park is actively removing them and changing some sections of the trails. On May 11, I'm hosting a small gathering of letterboxers to check on as many of the boxes as we can, update their status, and move any which are in danger.
Memorial Park is a delight for letterboxers and filled with boxes. Don't expect to find all the boxes in one weekend. It will keep you coming back for more with new suprises - boxes with high find count restrictions, mystery boxes, puzzle boxes of different levels, and others I can't talk about. Many of these are there thanks to dewberry who hosted events and planted numerous boxes in the park. So enjoy the park, and if you are looking for dewberry's boxes - she has very short steps!
Here are some link's to maps of the park:
Memorial Park Conservancy's official map - the best one for trails
Recent new trails - this shows some trails not on the main maps
Texas Mountain Biking map - this little map shows a trail around the picnic area that connects the green and blue trails. This may be useful for the boxes around the picnic area.
I'll be consolidating the maps for the event next week and marking locations of as many boxes as I can. Check back in a few days for more details.
Thursday, May 2, 2013
Letterboxing Lake Somerville
Last month I took a short trip up to Lake Somerville to get the remaining boxes which I missed on my previous trips. By chance I camped at Nail's Creek State Park on the southern side of the lake. By arriving on Thrusday night, I had my pick of campsites and I got a great view of the lake.

On Friday morning, I looked for PI Joe's Calvaryman box which is a decent hike even from the closest access point. On my way back I heard a loud hawk nearby, and realized I parked right under the nest!


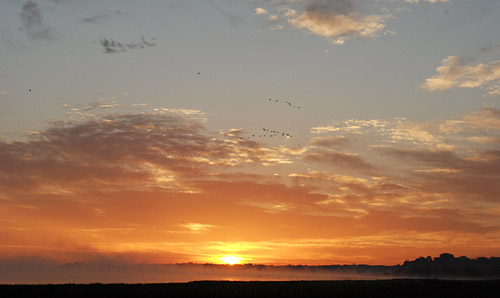
One of the highlights of the trip was waking up to a glorious sunrise over the lake. So I'll leave you with some sunrise photos. The one picture I should have taken was on the way home...there were hundreds of people on the roadside taking pictures of bluebonnets outside of Brenham! They caused quite a traffic slowdown. But back to your sunrise pics...


On Friday morning, I looked for PI Joe's Calvaryman box which is a decent hike even from the closest access point. On my way back I heard a loud hawk nearby, and realized I parked right under the nest!
I continued on to Birch Creek State Park and picked up a few boxes. In the afternoon I met up with NativTxn who lives nearby and spends a lot of time at the park. She helped me find two boxes I missed, and we planted one of her newly carved stamps. By the time we finished I had walked about 10 miles for the day and we headed back to our campsite. We enjoyed the evening and exchanged some stamps at our picnic table.
Saturday morning, NativTxn had to leave so I spent the morning finishing up a stamp to plant at Nails Creek. I've censored the image so you don't get a spoiler, but you might notice all the colored pencils below...you will want to color this one in!
One of the highlights of the trip was waking up to a glorious sunrise over the lake. So I'll leave you with some sunrise photos. The one picture I should have taken was on the way home...there were hundreds of people on the roadside taking pictures of bluebonnets outside of Brenham! They caused quite a traffic slowdown. But back to your sunrise pics...
Subscribe to:
Posts (Atom)